© All rights reserved 2019
Whether you are looking to get into Real Estate Photography, or just trying to improve the quality of your photos to land bigger/higher paying jobs, you are probably hoping to service one of three types of clients:
Rather than trying to tell you exactly what each of these types of clients might want, and believe me, they all have different needs, I thought it would be better to cover the best real estate photography tips “Overall” so that you can tackle any job that you get the opportunity to shoot going forward. So, if you’re ready, let’s dive in…
You have probably come across a lot of agents that need aerial photography or video, and although you should always be prepared for any clients needs by having as much equipment as possible (Because you could lose work if you don’t), you should also know that there are a lot of agents out there that don’t always need drone footage. Many open listings (Houses with multiple agents selling) would be one example.

You have probably come across a lot of agents that need aerial photography or video, and although you should always be prepared for any clients needs by having as much equipment as possible (Because you could lose work if you don’t), you should also know that there are a lot of agents out there that don’t always need drone footage. Many open listings (Houses with multiple agents selling) would be one example.
Generally, if you are aiming at luxury homes, you will need a drone, or at least access to one. I would say to partner with an aerial photographer, but having a dedicated pilot might increase your price over the competition, and in Real Estate Photography it’s always about the budget!
Having a drone can also increase the likelihood of a realtor wanting to build a relationship with you as they can be sure that when they need drone photography, you have them covered!
Depending on who you know in the industry, or who you don’t, it may take some time to get your first few real estate photo shoots. You may even start out shooting homes for free to get some experience and a portfolio, and if you do, you will be surprised how hard it is to give away work!
The fact is that people will hire a bad photographer they know rather than invest in a good photographer they don’t (Most of the time). It’s a hurdle you are going to have to overcome, and there will be times when you feel like the phone will never ring, but that is usually when it does!
A wide angle lens is going to be your primary lens in all real estate, interior, and even architectural photography applications, although architectural usually requires a “Tilt/Shift” Wide angle lens so as to maintain the proper perspective. It’s simple: Wide angle lenses make rooms and spaces appear larger, and bigger is better!
I would say that the industry average for a wide angle lens is going to be 16mm on a full frame sensor camera, and 12mm on a crop sensor. I myself happen to shoot with a 14mm Rokinon on a Nikon D850. This is a prime lens although that is certainly not necessary for everyone to use, but it will generally be a more affordable place to start.
I’ll admit it: Shooting handheld in certain situations speeds up my workflow greatly, but that is usually only ever a good idea in really tight spaces or where the lighting is perfect and I will not need to use photo blending. General, however, you are going to experience rooms with difficult lighting situations such as a window with a lot of sunlight coming through on a dark room. You simply can’t shoot that room correctly with one shot, even with in camera HDR.
A tripod will allow you to properly frame, level, and shoot multiple exposures, with flash, and blend your various exposures later in Photoshop for the best overall image.

A lot of people trying to decide on the right camera equipment tend to reach a common question at some point: What’s more important- A Full Frame Sensor or having more megapixels? The truth is that as megapixels get higher and higher in more and more cameras, they are actually becoming less of a factor and for mainly one reason: “Mobile”.
10 years ago, most people would have seen your pictures on a desktop but as of 2019 most people are going to see your photos on a mobile device or, at the most, a laptop. That being said, two things that Mobile cannot bail you out on are going to be field of view and lighting, the main reasons full frame cameras are so desired in Real Estate.
Most agents and home buyers won’t notice the difference between a 20 megapixel sensor and a 40 megapixel sensor, but anyone with two eyes WILL notice a poorly exposed shot that shows less of a room or property
This is a big problem for me! I am always so eager to shoot a new room I forget to prepare it by doing some of the most basic things, but thank God for Photoshop!! While we are at it, let’s cover how you should prepare a house for your photo shoots.
Ideally we want to shoot every home in sunny weather with a few clouds for contrast but eventually you are going to run into some streaks where bad weather is seemingly interfering with out of your photo shoots. When this happens it’s best that you have a plan rather than simply telling those real estate agents you worked so hard to get that you have to continue to cancel.
So how do we overcome bad weather? “Sky Replacement“.
These are the really neat photos that look way to good to be true. Well, they are, and they are actually not that difficult to do once you have done it a few times inside of Photoshop.
Sure, most of the time a photographer replaces a sky is it to add flair or artistic liberty to their shot, but there is nothing wrong with us doing it for a more practical use- Like keeping a job.
Ahh yes, the “Magic Hour” for photos, when you have that gentle light hitting the house with the backdrop of a sky that has a beautiful blue tone and maybe some yellows/oranges from an epic sunset. If you can nail these types of shots you can make a name for yourself quickly, and of course, some nice change!
But you don’t get paid simply for shooting at dusk, you get paid more because these shots are difficult.
For starters you get little time to get it right. Miss it, and the shot is gone for 24 hours. Secondly, because your light is so soft, the exterior of the house is going to need artificial lighting which means you using a flash. But you can’t light the entire house with one big light, just wouldn’t look good. You have to walk around to individual areas and light them at just the right power and just the right angle. When you are all done, you now have to blend multiple photos, sometimes into the double digits, in photoshop just to deliver one picture.
Sound fun?
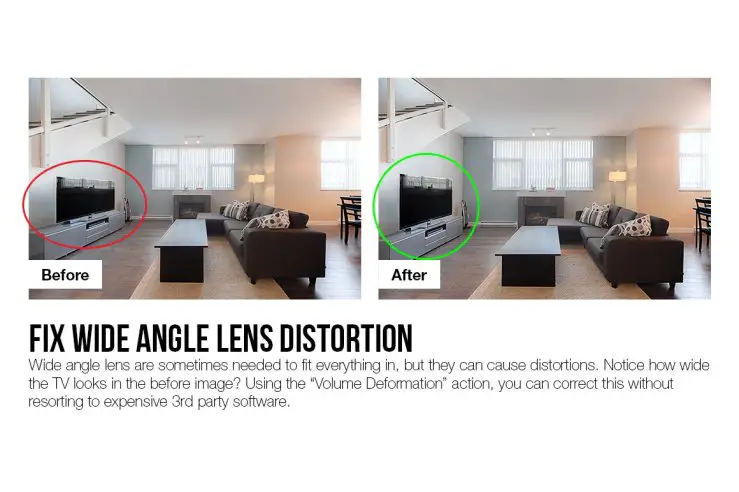
When you are shooting with a wide angle lens you have to be super cautious about being level and keeping your distance. Wide angle lenses, especially the budget variety, are very sensitive to close distances and vertical lines, as you can see in the picture to the right.
Thankfully, even if you are just a bit off on location, photoshop and lightroom can correct most distortion, but you will lose portions of your shot in the process- Something to keep in mind before relying completely on post processing. This type of thing isn’t an issue for most real estate agents, but interior designers won’t be very pleased!
For some odd reason I have seen some real estate photographers use a fisheye lens rather than a super wide angle lens. I can’t really say why, other than to assume maybe they want to capture more of the rooms and make them look bigger, but the look is just going to be too artificial, so I personally would advise against it. This especially goes for Interior Designers!
The only time it is ok to get creative with your photo edits is when you are blending multiple exposures. Outside of that, you should never start HDR toning and going overboard with settings like sharpness or saturation. The people looking for a home don’t want to know what it would look like in a Marvel Comic, they wan’t to know where they are going to be calling home for the foreseeable future.
Make your photos attractive, but do so while maintaining reality
Time is money, and in a professional service business like photography, if you aren’t shooting your next house you aren’t making more money! So, speed up your workflow by loading up on presets in lightroom, or maybe even create your own if you are talented enough. Yes, Photoshop does allow for certain types of presets, but they are a bit more complex in their use that similar “Presets” in Photoshop.
This guy may not look like much when he filmed this video, but these days he’s a huge influencer on YouTube for all major camera companies and is super successful in every respect!
The moral of the story here is that we all start somewhere and have the opportunity to end up somewhere better (If we put in the work). One major benefit we have these days are websites, blogs, and YouTube instructors like this. Using just YouTube I have learned techniques I never thought I would ever pull off and I did it for free!
You have a digital camera, now act like it! Shoot as many photos as you need to shoot until you are comfortable that you have “Something” you can deliver to the client. The worst case scenario is that you have to delete a ton of photos, but that’s always going to be easier than needing to create one you didn’t take!
In your early days, you need to experiment and practice by trying new techniques while on the job, and even off the job in your own home. But if you are learning on the job don’t forget that you still have a product to deliver.
We as modern digital photographers have one advantage my Father (A professional Photographer) never had in his day- Social Media and A Website.
I spent about 8 months fully entrenched in learning something called SEO (Search Engine Optimization), which is essentially the “Art” of making sure people can find you online. Isn’t that something you want to do as an aspiring photographer? Maybe when I tell you that 30% of all Google searches are for Images you will be more interested…?
Today when I finish a shoot I will always render out copies of the best shots to a smaller size that is perfect for social media and Google Image Search. At first the needle isn’t really going to move, but as time goes on and your library of images (Properly tagged/titled) grows, people will take notice. Maybe they’re just looking for images to share, but maybe they need stock photography, or would even like to hire you to replicate something you did that they liked.
Think about it: When people are trying to figure out what looks good, they tend to search online to see what other people have done. My recommendation to you is- Make sure you show up there (It Can’t Hurt!)
If you are going to post your photos online and via social media, you are going to need to pay close attention to your file sizes and image dimensions.
Apps like Instagram especially are notorious for having algorithms that absolutely destroy the quality of images, and that’s understandable given the reason which is to ensure their platforms run smoothly. Imagine if you could go on there and upload 20-megapixel photos that people would only be viewing from their phone. If you have ever seen those photos that appear to have great colors and exposure but are soft you are likely looking at someone who uploaded an image that was entirely too big.

Keep your images under 1080 x 1080 and your file sizes under 500kb. Of course, you can go over this from time to time and not experience any great loss of load time or quality via apps. One time, in particular, I may exceed this limit is when I am posting ahead to a web page and I want to define a little more quality. In that case, I will bump to 2100 and maybe hit 1mb.
So after a lot of posting, hashtagging, and sharing, I find that a few places stand out as strategically important for photographers to post their photos to get attention and more importantly, jobs. These places are:
To elaborate a bit, having your own website is essential. Making sure the website is built correctly is even more essential. I only really know WordPress, and although it’s a bit more complex, it’s getting much easier to build a site for the average person, but if you need a pure web page builder the only one that is good for SEO is going to be Squarespace. It comes down to how the sites are structured and coded and Google can read Squarespace the best, far better than Wix, for example
Believe it or not, this is super essential if you want to shoot real estate photography as a business. This is a place where Google can make you stand out as a local business, and also a place that most businesses and photographers ignore. If you spend time on it, put in good information about yourself, post pictures, it will reward you by showing you in search results!
Instagram is a no brainer, but these days it’s soo saturated you need to pick a niche. If you do houses, try to post only houses. I must say, I am bad at this because I shoot a few different things. But for you, if you can, pick one type of photography and post only that. Eventually Realtors, Real Estate Agents, and even construction companies/architects will take notice and you WILL get messaged for jobs.
-People actually do search Instagram for various hashtags to find contractors in their area!
As for the rest of the crowd: Pinterest and Medium are the sleepers. Pinterest is big for female viewers, and if you take nice shots of nice homes, you could do very well there. Medium is the extreme unknown, but if you make posts with a lot of pictures, like from individual shoots, those images get indexed surprisingly well by Google and you can start to show up on image searches very quickly.
Posting images isn't always about one person seeing one picture and you getting work. Your images floating around Google drives traffic, which Google sees and then assumes is the result of you being a very good photographer and this is when people in your area are searching Google and you start to pop up as the solution to their problem: Needing A Real Estate Photographer
AH360 Photography Tweet
Every room you enter will be different, with different colors, and different lighting. Flash is the one constant you can rely on to balance everything out in the end.
Now when I say you should use Flash Photography I’m not saying you should get out your speed light and point it around the room. That will cause deep shadows along with lighting that is just way too harsh for the type of finished product we are looking to produce.
Flash photography in Real Estate is more about photo blending where you get your initial “Ambient” (Using Natural Light) shot then merge it together in post-production with a flash shot (Most of the light is artificial). This method allows you, and not the room, to dictate the colors and tones of your photos so that you can align them with your, or your clients, particular style.
Having a contract was fundamental back in the day and for some reason, photographers have moved away from it, but without a contract, you could get stuck not being compensated fairly for your time and effort.
Let’s say, for example, you quote a price for shooting a home based on square footage and time. Well, what happens when you get there and nothing is staged?

The answer to that question shouldn’t be something you work out, it should be something that has already had an answer in a legally binding document. Photography may be your passion, but above all, it is your business! (Article on real estate photography contracts)
As Photographers we usually spend most of our time worrying about our own equipment being damaged or staying clean, but what about objects inside the home, or even people walking around your equipment. What if something is broken or someone is hurt and it is related to your equipment, do you have “Photographers Insurance“?
This isn’t really something I thought about, but after reading into this for this article, I think it’s something I am going to need as I start working on million dollar Yachts and Homes.
I’m a bit new to these myself because I love control when it comes to editing, but Lightroom presets and Photoshop actions will make your life a bit easier and speed up the time in between photo shoots and photo delivery. And remember: If you are not on your next shoot, you are not earning your next dollar!
As work begins to pick up you will probably find the need to balance your shooting time, traveling time, and delivery time with more and more efficiency to keep your agents happy. One option you do have is to use a third party Real Estate Photo Editing Service. Yes, this will remove your personal touch from your photos, but if you are faced with the possibility of losing clients over delivery time, using a service like this should be a no brainer. Always, awlays, always deliver on time! That is probably the second most important part of keeping real estate photography jobs directly behind quality. In fact, to some agents, they will actually skimp on quality to get the photos online faster (Not Kidding).
The cost of someone else editing your photos? Seems to be anywhere from a few dollars an image up to about 10, obviously depending on the amount of work you want, such as if you need sky replacement, etc…
We could cover each type of room and go over which might require how many photos, but then I would always end those recommendations with- “But if it’s nice then shoot more”. So to keep things simple, shoot 2-3 shots of the main (Feature) areas of the house and no more than one of the utility type areas *unless they are super nice.
I have found that from Houses to Yachts when it comes to rooms like bathrooms it’s about simply letting potential buyers know that the rooms are there, not making them look glamorous.
All that being said, the only exception to this is when you are a new photographer and you are still learning your style/angles. In that case, take at least 2 different shots of every room so that you have options and flexibility to decide on what you like later.

© All rights reserved 2019